Stretching Molecule Tutorial
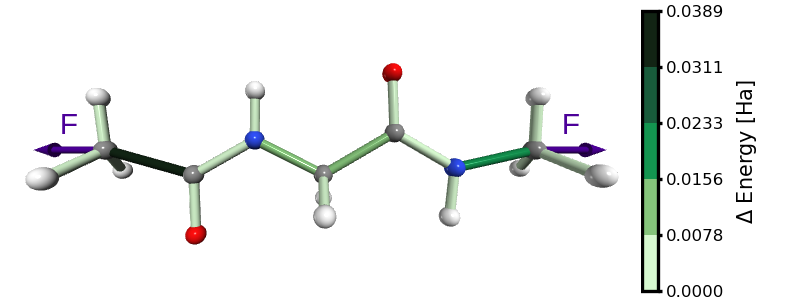
Figure 1. Energy distribution in glycine with ACE and NME capping groups, stretched by an external force as showed in this tutorial.
Attention
To use the sith tools described in this tutorial, make sure to
import Gaussian as explained in Load-modules.
In this tutorial, we will stretch a glycine amino acid capped with ACE and NME groups. The stretching is applied between the terminal carbon atoms of the peptide, until a bond rupture occurs (Figure 1).
The stretching process works as follows:
Optimize the structure without any constraints.
Increase the distance between two selected atoms.
Fix that distance as a constraint.
Re-optimize the structure.
Repeat the process with the optimized configuration from step 1.
At each stretching step, we compute the forces acting on selected internal degrees of freedom. These forces are then used to calculate the distribution of energies.
Prepare Your System
Before stretching, identify your molecule and select the atoms to pull apart. In this example, we use a glycine capped with ACE and NME groups (G.pdb file from the repository https://github.com/Sucerquia/Gdata4tut that you can use as a reference).
For stretching, we select the carbon atoms from the methyl groups at both capping ends (Figure 2). Using a molecular visualization tool, you can check their atom indices (1-based indexing). Here, the correct indices are 1 and 16.
Alternatively, you can confirm the indices by inspecting the PDB file and locating the CH3 carbons in the ACE and NME groups.
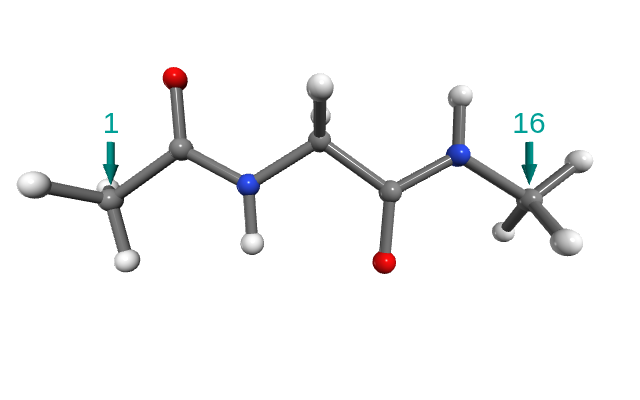
Figure 2. Glycine with ACE and NME caps. The arrows point out the carbons used for stretching.
Perform Stretching
Once the system is prepared, perform stretching using sith/g09_stretching/stretching.sh:
sith stretching -c -i 1,16 -m G.pdb
On 16 cores, this calculation takes ~15 minutes. On a single core, it may take ~2 hours. Our stretching process is taking place until a bond rupture occurs. The broken molecule is saved in a directory called rupture. In this case, the rupture occurred between the ACE methyl group and the rest of the molecule (Figure 3).
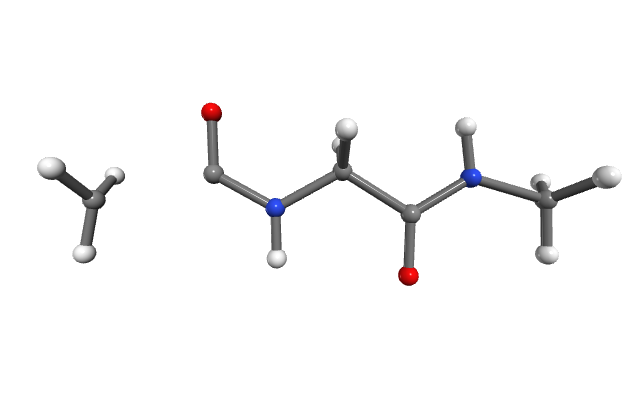
Figure 3. Molecule after bond cleavage.
This tool will produce the next outcomes:
frozen_dofs.dat
First line: atoms used for stretching, marked with F (here: 1 16 F).
Second line: atoms involved in the rupture (here: 1 5 F).
Stretched structures: G-stretched<n>.<ext>
<n>: stretching step index (0 = unconstrained optimization).
<ext> includes:
.chk: Gaussian checkpoint file.
.com: Gaussian input file (with distance constraints).
.fchk: human-readable checkpoint file with final optimized structure.
.log: Gaussian log file.
.xyz: optimized coordinates.
rupture/: directory containing files for the cleaved molecule (Figure 3).
Extract Forces
With stretched structures computed, the next step is to extract the forces in a
format readable by sith. You can do this using
sith/g09_stretching/find_forces.sh for each structure:
mkdir forces
sith find_forces -c -f "G-stretched<n>.chk" -p stretched -v
This creates a forces/ directory containing G-forces<n>.<ext> files, with
<ext> = com, log, chk and fchk. The fchk includes the necessary
information for energy distribution analysis. Internally, these are generated
using formchk -3 G-force<n>.chk and the corresponding Gaussian log
file formatted according to sith.readers.g09_reader.
Instead of doing it one by one, you can compute all at once in parallel using:
mkdir forces
for i in G-stretched*.chk
do
  sith find_forces -c -f $i -p stretched -v &
done
Run SITH Analysis
Now everything is ready for the actual analysis!
Load the force data and compute the energy distribution with sith:
from sith import SITH

sith = SITH('./forces')
sith.sith_analysis();
The resulting sith.SITH.SITH object stores all necessary information
for further analysis.
For more details on available analysis methods, see SITH Analysis Tutorial.